


NOTE for integration: This is only relevant if you use ue5.1 or ue5.2. So if you use ue5.3+ you can ignore this note... If you want to integrate the inventory in a 5.1 or 5.2 project make sure that you create the inventory project in ue5.0 (NOT 5.1 or 5.2) Then you can migrate the inventory to your 5.1 or 5.2 project and you should be fine.
Here is an image showing some basic inventory functions:
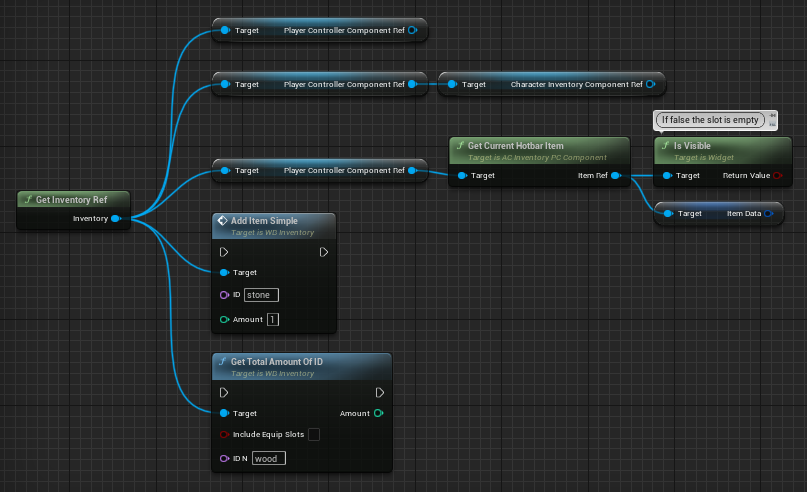 Having a reference to WB_Inventory is very useful. GetInventoryRef is a global function that you can get in every blueprint.
If you use it really often in a certain blueprint it might be useful to create an inventory reference variable but it is not necessary.
With the inventory ref you get access to the inventory player controller component AC_InventoryPC_Component.
For example you can get the current selected hotbar item from it.
(NOTE in general if an inventory item is not visible the slot is empty so there is no item.
If you get the item data make sure before that the item is visible).
From the player controller component you can also get the CharacterInventoryComponent.
To come back to the inventory reference the AddItemSimple node is often used to add items to the player’s inventory.
Also GetTotalAmountOfID is useful to count the current amount of items in the inventory.
You can also check if the amount is bigger than 0 to find out if at all an item is in the player’s inventory.
If you want that the server adds items to a player the server needs to know the controller of this player and by that can execute something like this:
Having a reference to WB_Inventory is very useful. GetInventoryRef is a global function that you can get in every blueprint.
If you use it really often in a certain blueprint it might be useful to create an inventory reference variable but it is not necessary.
With the inventory ref you get access to the inventory player controller component AC_InventoryPC_Component.
For example you can get the current selected hotbar item from it.
(NOTE in general if an inventory item is not visible the slot is empty so there is no item.
If you get the item data make sure before that the item is visible).
From the player controller component you can also get the CharacterInventoryComponent.
To come back to the inventory reference the AddItemSimple node is often used to add items to the player’s inventory.
Also GetTotalAmountOfID is useful to count the current amount of items in the inventory.
You can also check if the amount is bigger than 0 to find out if at all an item is in the player’s inventory.
If you want that the server adds items to a player the server needs to know the controller of this player and by that can execute something like this:
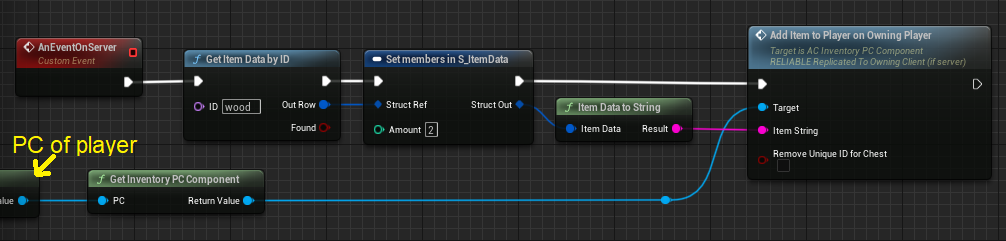 The ‘PC of player’ should not be the ‘get player controller node’ but maybe a player controller variable that the server received from the player.
For example a player wants to harvest an actor and requests it from the server while also passing its own player controller.
The server checks if the HP of the actor to harvest is still bigger 0 and there was no other player who requested the harvest a millisecond before.
Then the server determines if it is valid that a player gets the item and there is no glitch that 2 or more people got an item if there was only one item left.
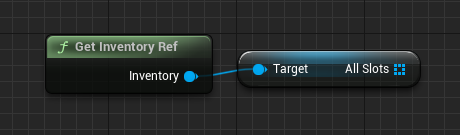
Moreover you can get an array of all item slots with the inventory reference:
The ‘PC of player’ should not be the ‘get player controller node’ but maybe a player controller variable that the server received from the player.
For example a player wants to harvest an actor and requests it from the server while also passing its own player controller.
The server checks if the HP of the actor to harvest is still bigger 0 and there was no other player who requested the harvest a millisecond before.
Then the server determines if it is valid that a player gets the item and there is no glitch that 2 or more people got an item if there was only one item left.
Moreover you can get an array of all item slots with the inventory reference:
Here are some small bug fixes. Mostly there will be a marketplace update but if you are working with the inventory already it's not worth for you redoing the whole integration process. Instead you can do the steps below.
This is for everyone who is using ue5.1.
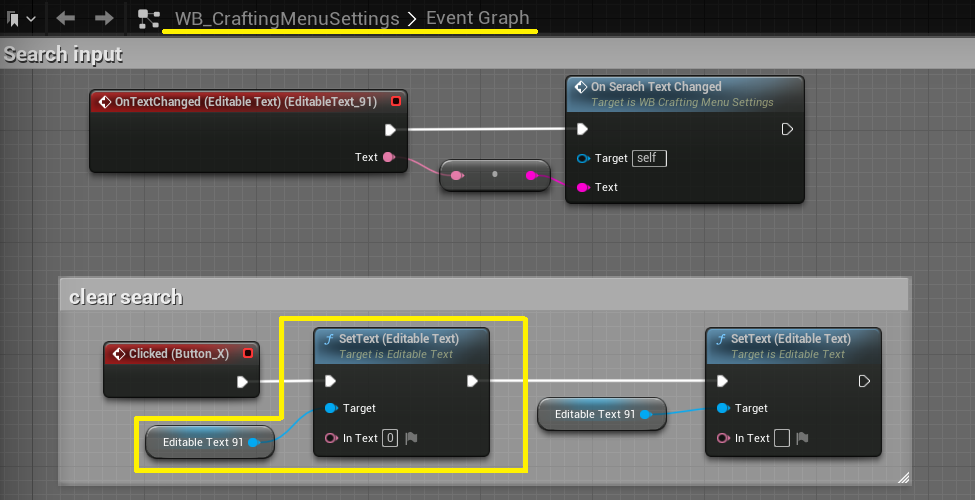
The SetText node for editable texts has a buggy behaviour in ue5.1.
The inventory uses it in the crafting menu. Because of the engine bug it is not possible to clear an entered text in an editable text box but only if the default text is empty too.
To fix it, go to the EventGraph of WB_CraftingMenuSettings where you need to execute the SetText node twice. Make sure that the text input of the left SetText node is NOT empty. So you can enter
for example '0' like on this image:
Ignore this if you've downloaded the inventory after the 29th of November 2022 (then you have already a version that includes the bug fixes of this version).
If you have a 5.0 project and integrated the inventory already, you can go to your project's directory, right click on the .uproject file and select 'Switch Unreal Engine Version...'.
Here choose 5.1 and click the Ok button. If you start the project now, it should open in ue5.1. Because of some engine bugs that appeared in 5.1 you can do the following workaround bug fixes:
1) Extend the following function like on the image:
 2) Be aware that the muzzle flash (P_MuzzleFlash) can cause the GPU to crash. But it can depend on the GPU model and it's drivers.
Anyways if you want to use P_MuzzleFlash, it's recommended that you open P_MuzzleFlash and deleted or deactivate all emitters except these two:
2) Be aware that the muzzle flash (P_MuzzleFlash) can cause the GPU to crash. But it can depend on the GPU model and it's drivers.
Anyways if you want to use P_MuzzleFlash, it's recommended that you open P_MuzzleFlash and deleted or deactivate all emitters except these two:

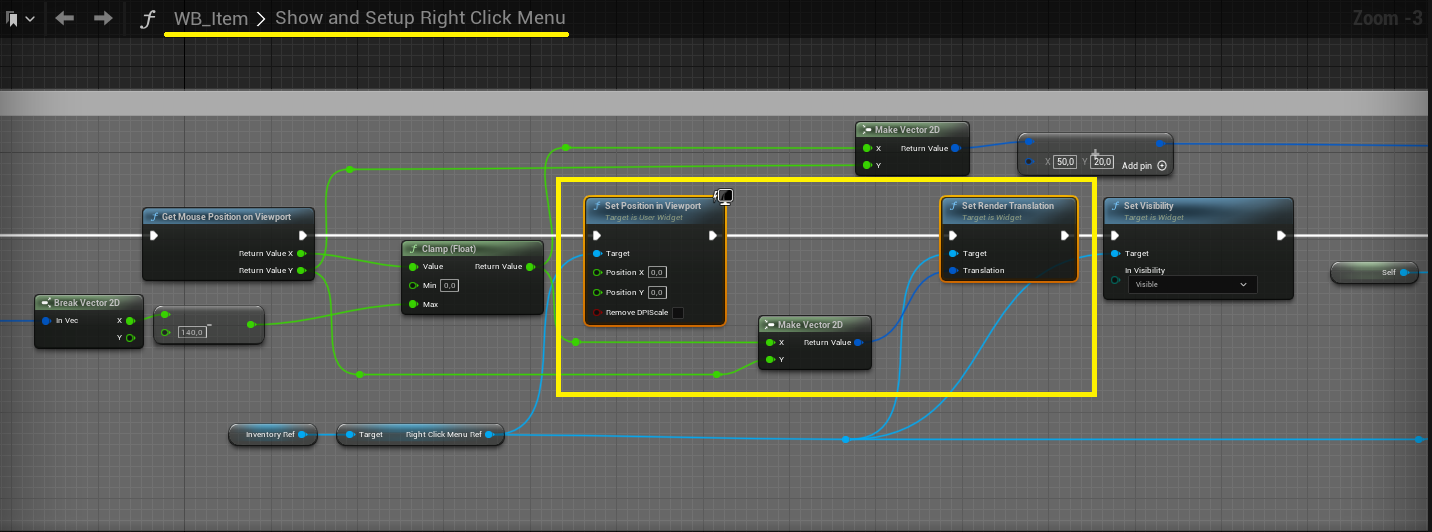
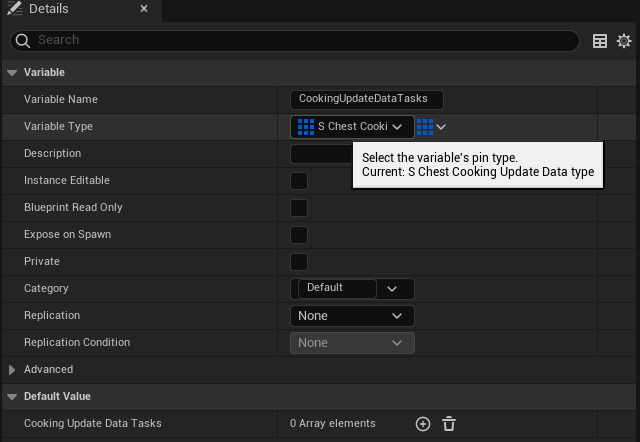
First, nothing to worry about the actual fuel reduction is working as intended in the backend. Only in the frontend visually the fuel item is initially not reducing if placing first a cooking item
and then a fuel item. But if the player updates the cooking UI only one frame later it should work. First create in AC_InventoryPC_Component this variable of the type S_ChestCookingUpdateData.
 Then you can fix it by modifying what the existing event UpdateOwnCookingUI is executing.

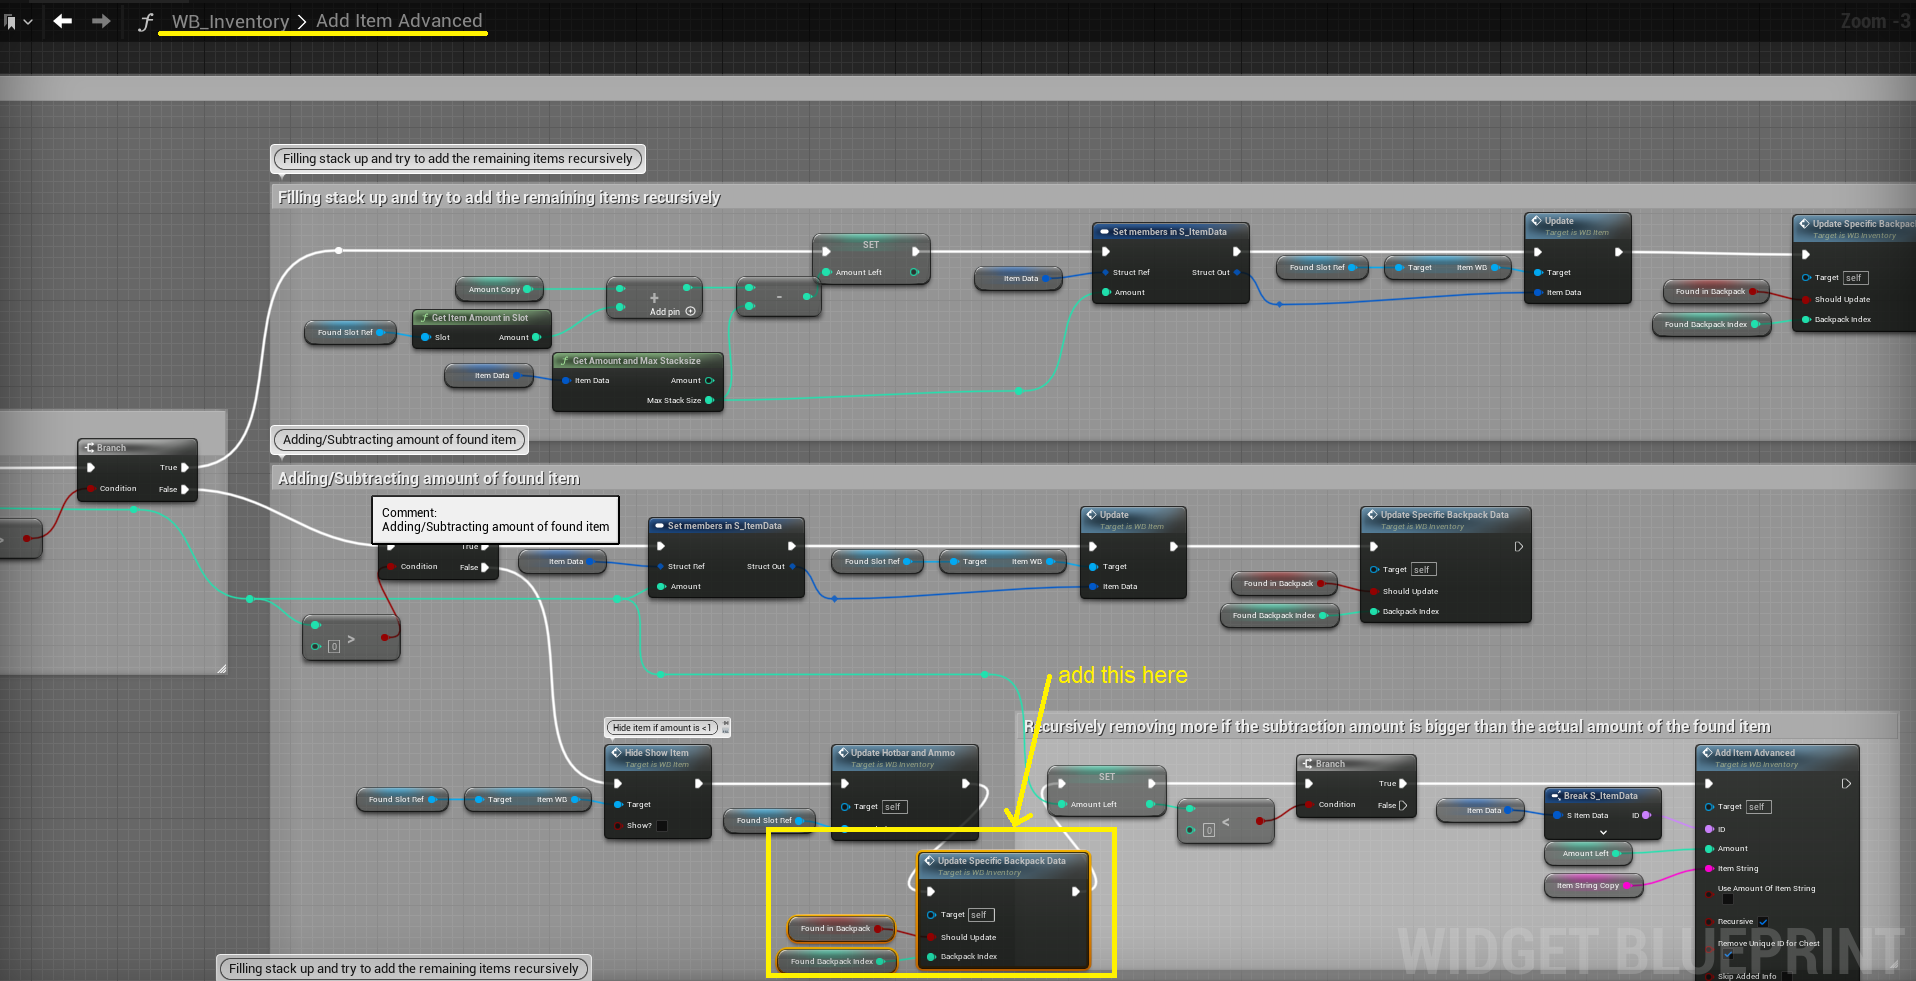
There is a possible item duplication if removing items from a backpack under certain conditions. You can fix it very easily by opening WB_Inventory and adding these 3 nodes here (in the yellow box):
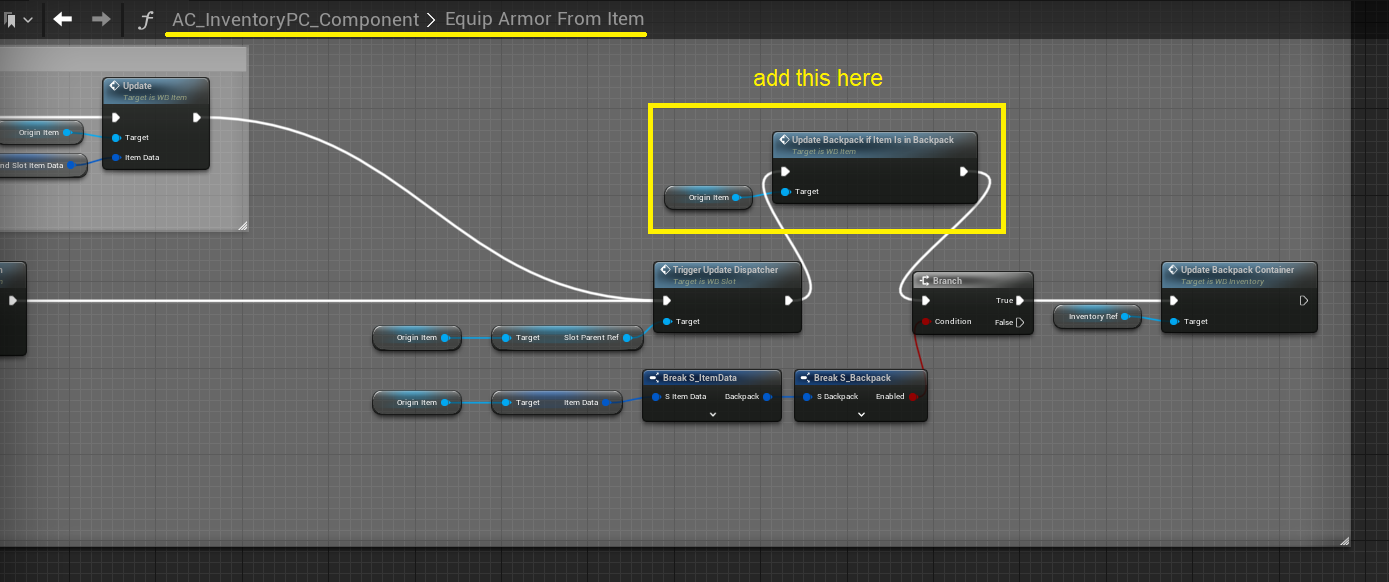
It's possible to duplicate an equip item if equipping it from a backpack with the right click menu. Easy Fix: Open AC_InventoryPC_Component and adding these 2 nodes here (in the yellow box) in the EquipArmorfromItem function:
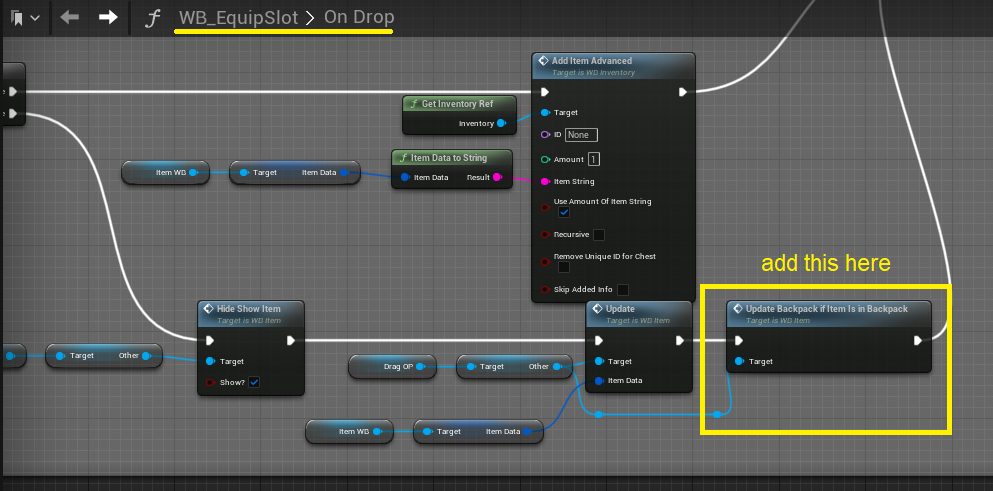
Dragging an equippable item from a backpack slot onto an equip slot that has already an item leads to the loss of one item. Fix it very easily by opening WB_EquipSlot and in the On Drop function add these 2 nodes here (in the yellow box):
There are 12 modules that you can turn on/off with one click in DA_InventoryModules:
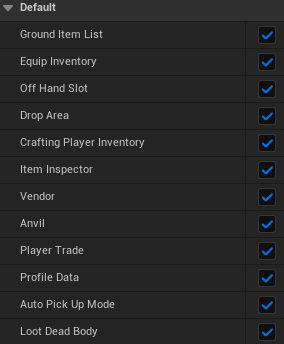 After turning off a module the blueprint is not executing blueprint nodes anymore that are related to that feature. Some of the modules are additionally just hiding widgets like for the ground list. However, for example if you don’t need the ground list you can also remove E_WB_GroundItemList from WB_Inventory (you would get one blueprint error that you should be able to resolve easily if you see it).
In general disabling modules only makes blueprints not be executed, it’s not removing the corresponding blueprints. Please do NOT try to remove these blueprint parts since if the blueprint nodes get skipped anyways there would be no measurable performance difference and you would keep the possibility to turn on the feature again in the future.
After turning off a module the blueprint is not executing blueprint nodes anymore that are related to that feature. Some of the modules are additionally just hiding widgets like for the ground list. However, for example if you don’t need the ground list you can also remove E_WB_GroundItemList from WB_Inventory (you would get one blueprint error that you should be able to resolve easily if you see it).
In general disabling modules only makes blueprints not be executed, it’s not removing the corresponding blueprints. Please do NOT try to remove these blueprint parts since if the blueprint nodes get skipped anyways there would be no measurable performance difference and you would keep the possibility to turn on the feature again in the future.
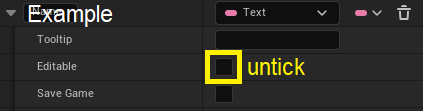
WARNING: In ue5 structures got buggy. Before you decide to add new variables to any structure I highly recommend doing a backup of your project.
If you add a new variable to the structure set 'Editable' to false for this variable to prevent unexpected and random structure compiling errors.
 VERY IMPORTANT: After you have added a variable to a structure save the structure but do NOT save other classes. Now test to play.
If this is not possible and you get confronted with bleuprint errors close your project and do NOT Save these classes and press 'Don't save'.
After that you can open your project again.
Another tip to reduce the buggy behavior and to keep the item data structure cleaner is to create sub structures (so normal structures that you add as a new variable to S_ItemData).
This makes sense if you want to expand the item data structure with different variables that belong to each other, like e.g. weapon data contains damage, shooting interval and so on.
VERY IMPORTANT: After you have added a variable to a structure save the structure but do NOT save other classes. Now test to play.
If this is not possible and you get confronted with bleuprint errors close your project and do NOT Save these classes and press 'Don't save'.
After that you can open your project again.
Another tip to reduce the buggy behavior and to keep the item data structure cleaner is to create sub structures (so normal structures that you add as a new variable to S_ItemData).
This makes sense if you want to expand the item data structure with different variables that belong to each other, like e.g. weapon data contains damage, shooting interval and so on.
In the data table DT_CraftingRecipes you can add a new row and set up the crafting recipe to your liking. The tags are relevant for the search inside the crafting menu WB_CraftingMenu.
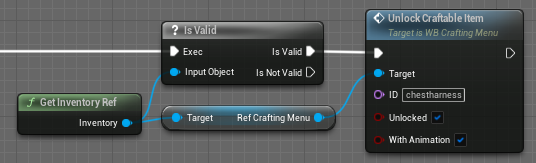
If you set a recipe in DT_CraftingRecipes on UnlockedByDefault: false, it will have a lock and you’re not able to craft this item. In your player controller you should find some key inputs (B, N, M) that should demonstrate how you can unlock a recipe.
From an inventory reference you need to get RefCraftingMenu and call the UnlockCraftableItem function. As ID enter the row name of a recipe that is added to DT_CraftingRecipe.
How it works:
All items are based on a huge structure S_ItemData. It contains all data of an item, such as the name, icon, amount and so on.
All these different variables can be categorized into two groups:
The first group contains all static variables. This is everything that doesn’t change while playing. For example the name or icon of an item stays always the same. Or the description of items with the ID ‘wood’ stays always the same, no matter what a player does with the item during gameplay.
The second group contains all dynamic variables. So everything that can change while playing. For stackable items this is for example the amount. Or if an item has durability, the current durability is always dynamic.
If you want to know how to add own dynamic variables take a look in Update item data variables at runtime (dynamic & static item data).
The ItemString is a formatted string that only contains the item ID and all dynamic data.
With the ID, all static variables can be loaded again from the item data table.
For you the ItemString can be used very easily. There are only two global functions that you need to know and that you can use in any blueprint. They convert the item structure S_ItemData to an ItemString and the other way around.
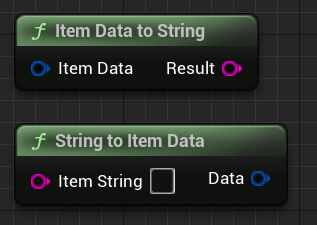 The main advantage is that it’s much lighter to have a small string which contains only the relevant item data instead of a big item structure that contains stuff like directory paths to meshes or textures. For replication this is more efficient. Additionally to that, it’s much easier to store strings on an online database instead of a whole structure.
The variables in the item structure S_ItemData are either static or dynamic to understand the difference and how it works take a look in ItemString: the light version of the item structure So how to proceed if you want to make a certain variable in S_ItemData dynamic - possible to edit the value while playing. First open BP_InventoryFunctions. Go to the function ItemDataToString. From the Break S_ItemData you need to get your variable and convert it to the string (if it is not possible to convert it to a string you also cannot make this variable dynamic). Then you need a new FormatItemDataString node where you can put your string value in the Value pin. Also make sure that ‘Add’ is true, otherwise it would ignore this node. Then you need to come up with a VariableNameID (like a key) - keep it short. Finally plug the Result of FormatItemDataString in a new pin of the Append node. Next go in the function StringToItemData. Add a pin to the Switch on String node. Make sure that this pin value matches the VariableNameID you applied before in ItemDataToString. Then you need to Set members in the ItemData variable or in a sub-structure of it and put it in the Value variable for the variable that should be dynamic. It helps look at how it is made for the already existing dynamic variables.
In your player controller you should find some key inputs that show how to trigger the save and load game functions for the inventory.
 By default chests/containers are ignored from the save & load game functions.
But you can change it really easily:
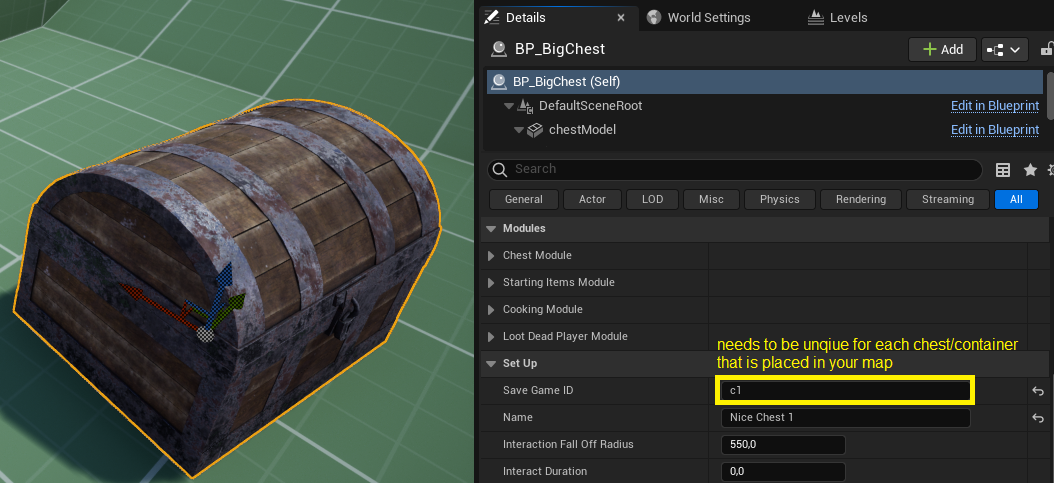
Select a chest in your map. There, go to the Details tab and set the SaveGameID. If the SaveGameID is unique among all other chests/containers placed in the map, it's relevant for save game. If you don't want that it will be saved you can set the SaveGameID to 'No save game'.
By default chests/containers are ignored from the save & load game functions.
But you can change it really easily:
Select a chest in your map. There, go to the Details tab and set the SaveGameID. If the SaveGameID is unique among all other chests/containers placed in the map, it's relevant for save game. If you don't want that it will be saved you can set the SaveGameID to 'No save game'.
First add a new entry to the ennumeration E_ArmorEquipSlot
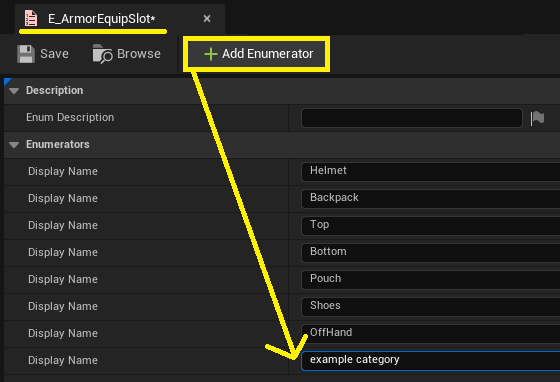 In WB_EquipInventory (in the Design tab) you can now add a new WB_EquipSlot (Select your category on the right). This slot does not need to be necessarily inside WB_EquipInventory but make sure that WB_EquipInventory has a reference to this new equip slot: Take a look in the EventGraph and make sure that the equip slot is part of the Slots array.
 Info: The progress of adding a new equippable item is shown in the AddItems tutorial too.
When you set up an item in a datatable make sure that the sub-structure EquipArmor is enabled and that you've selected your new category in the variable EquipSlot.
Info: The progress of adding a new equippable item is shown in the AddItems tutorial too.
When you set up an item in a datatable make sure that the sub-structure EquipArmor is enabled and that you've selected your new category in the variable EquipSlot.
 If you play and try to equip the new item it will search in your character for a skeletal- or static mesh or a child actor (depending on what you added in the item table) that has a tag that matches the category you've added before in E_ArmorEquipSlot.

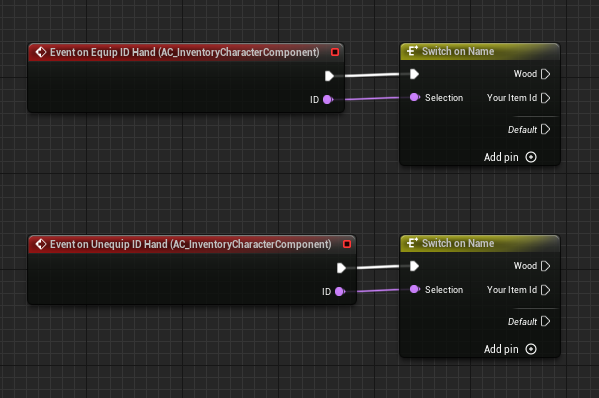
There are several events that get triggered (already replicated, so they get called on each client and the server) if you equip or unequip an item either in hand or body. You can make use of these events if you add them in your character. Then click on AC_InventoryCharacterComponent and in the Details tab you can add these Events to your Event Graph like on the image shown below.
 Hand (hotbar)
Whenever you select an item in the hotbar (hand equip) EventOnEquipID_Hand and EventOnUnequipID_Hand get triggered.
You can add Switch on Name nodes here to execute further events that should happen on equip or unequip of a certain item ID.
Hand (hotbar)
Whenever you select an item in the hotbar (hand equip) EventOnEquipID_Hand and EventOnUnequipID_Hand get triggered.
You can add Switch on Name nodes here to execute further events that should happen on equip or unequip of a certain item ID.
 Body/Armor (Equip Inventory)
There are also several events that get triggered if there are any changes of items being added or taken away from the equip menu:
Body/Armor (Equip Inventory)
There are also several events that get triggered if there are any changes of items being added or taken away from the equip menu:
 As you can see, the last event EventOnEquipmentChanged_GetAllEquippedItems passes an array of all equipped body items.
Example - armor points and damage reduction:
This is useful if you want to calculate for example armor points.
So for example with ForEachLoop you can calculate a sum of an integer variable (that you need to add - a variable that should represent the armor strength of this item).
This sum can be stored in a variable that could be implemented in your damage system for damage reduction.
Here it would also make sense to calculate this variable only on server and since this event is triggered for all players,
you can make sure with a SwitchHasAuthority node that it only will be calculated on Server (Authority = Server).
As you can see, the last event EventOnEquipmentChanged_GetAllEquippedItems passes an array of all equipped body items.
Example - armor points and damage reduction:
This is useful if you want to calculate for example armor points.
So for example with ForEachLoop you can calculate a sum of an integer variable (that you need to add - a variable that should represent the armor strength of this item).
This sum can be stored in a variable that could be implemented in your damage system for damage reduction.
Here it would also make sense to calculate this variable only on server and since this event is triggered for all players,
you can make sure with a SwitchHasAuthority node that it only will be calculated on Server (Authority = Server).
These are filters that are used in different areas of the inventory. Generally every slot can have a filter to determine which items it accepts. For backpacks or chests it’s also possible to apply filters to all of their slots. Besides that these filters also find a use case for AutoPickUpMode. How to adjust the filters ItemFilter: It’s a String that you can leave empty to apply no filter. Enter all item IDs separated with ',' that should get accepted. Starting with '!' inverts the filter (so these items are excluded). NOTE: the '!' should only be the first char of this value and NOT in front of each item ID. CategoryFilter: Same as ItemFilter it’s a String that you can leave empty to apply no filter. Enter all item categories separated with ',' that should get accepted. Starting with '!' inverts the filter (so these categories are excluded). NOTE: the '!' should only be the first char of this value and NOT in front of each category.
These are the default item categories:
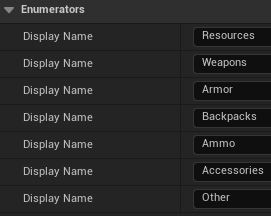 They can be used for Item Category Filters so for example you could make a chest that only can store items of the category Resources. Or that your character only can auto pick up items of the category Ammo.
Besides that the item category is being displayed in the ItemInfo, InfoPickUp and the ItemInspector.
To add or remove item categories you can simply do that in the enumeration E_ItemCategory.
To apply or change the item category of an item you can do that in the ItemDataTables (AdditionalGeneralData->Category)
They can be used for Item Category Filters so for example you could make a chest that only can store items of the category Resources. Or that your character only can auto pick up items of the category Ammo.
Besides that the item category is being displayed in the ItemInfo, InfoPickUp and the ItemInspector.
To add or remove item categories you can simply do that in the enumeration E_ItemCategory.
To apply or change the item category of an item you can do that in the ItemDataTables (AdditionalGeneralData->Category)
Automatically picking up items if a player walks above item actors.
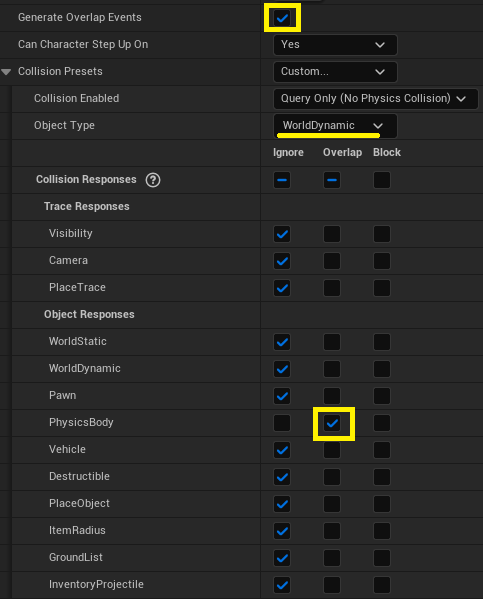
The inventory automatically fetches a box or sphere collision component in your character that has the tag ‘autopickup’
 Also make sure that this collision component has Generate Overlap Events enabled,
has an object type of WorldDynamic and overlaps PhysicsBody all other channels can be set to Ignore. Like here:
Also make sure that this collision component has Generate Overlap Events enabled,
has an object type of WorldDynamic and overlaps PhysicsBody all other channels can be set to Ignore. Like here:
 By default the auto pick up mode only picks up Ammo. This is an Item Category filter in AC_InventoryCharacterComponent. There you can adjust the filters in the 2 string variables CurrentAutoPickUpModeItemFilter and CurrentAutoPickUpModeCategoryFilter (Help to set up these filters).
The AutoPickUpMode is a module that you can turn off in DA_InventoryModules.
By default the auto pick up mode only picks up Ammo. This is an Item Category filter in AC_InventoryCharacterComponent. There you can adjust the filters in the 2 string variables CurrentAutoPickUpModeItemFilter and CurrentAutoPickUpModeCategoryFilter (Help to set up these filters).
The AutoPickUpMode is a module that you can turn off in DA_InventoryModules.
To make an item consumable you need to go to the item in the item data table. There under 'ConsumeItem' set Enabled to true.
Now you can hold right mouse button while you’ve the item selected in the hotbar / holding it in hand (to change the right mouse button input you can do that in your player controller).
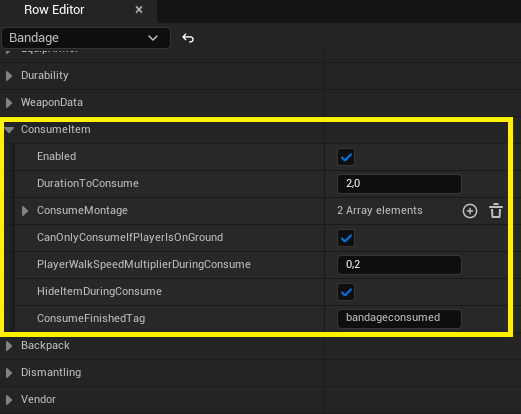 In the item data table you have more settings like duration or wether the item should only be consumable if the character is on ground -> this could be
useful if you add a consume montage where it could look bad if the character is playing the montage while jumping or moving. It is an array so
you could play different montages depending on potentially different skeletons that your player character can have.
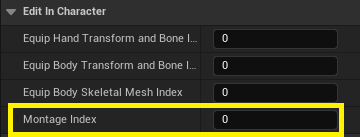
To determine which array element should be taken here by a character, you can change the array index by adjusting the MontageIndex in your character.
You can find that if you select in the components tab AC_InventoryCharacterComponent in your character. In the Details tab you can now adjust the MontageIndex.
In the item data table you have more settings like duration or wether the item should only be consumable if the character is on ground -> this could be
useful if you add a consume montage where it could look bad if the character is playing the montage while jumping or moving. It is an array so
you could play different montages depending on potentially different skeletons that your player character can have.
To determine which array element should be taken here by a character, you can change the array index by adjusting the MontageIndex in your character.
You can find that if you select in the components tab AC_InventoryCharacterComponent in your character. In the Details tab you can now adjust the MontageIndex.
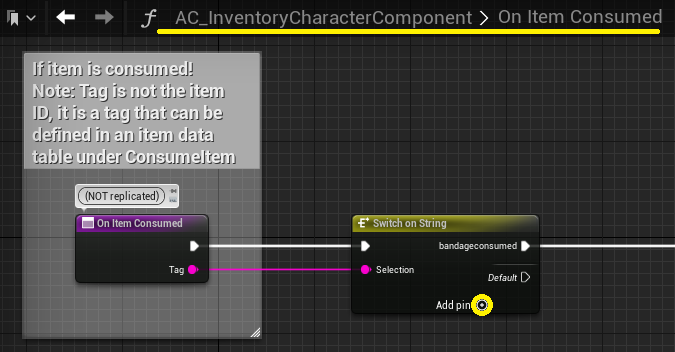
 Finally in the data table you can set the ConsumeFinishedTag. This tag will be passed in a function that will be triggered once you have consumed an item.
Depending on the tag you can execute further events and effects.
In AC_InventoryCharacterComponent you can find the function OnItemConsumed.
Here you add more tags to the 'Switch on String'.
Finally in the data table you can set the ConsumeFinishedTag. This tag will be passed in a function that will be triggered once you have consumed an item.
Depending on the tag you can execute further events and effects.
In AC_InventoryCharacterComponent you can find the function OnItemConsumed.
Here you add more tags to the 'Switch on String'.
 The off hand / 2nd hand slot is a special equip slot that is managed by the WB_EquipInventory. Hence the WB_EquipInventory has a reference to this equip slot.
The inventory has a torch item as example for an off hand item - if you equip a torch to this slot,
the torch shows up in the player’s left hand and the character also enters a holding pose in the animation blueprint.
Off Hand Compatibility
There might be some items (like certain weapons) that need both hands.
In this case the off hand should not be compatible anymore. During a not compatible item is selected in the hotbar, the off hand slot will be turned temporarily inactive.
To define this compatibility you can set it up in the item data table where the off hand item is.
Under EquipArmor you can find a field OffHandCompatibility_IfOffHand. If you hover that you should see a tooltip with an explanation how to use it.
However, here is this explanation too:
Only valid if EquipSlot is set to OffHand.
If it should be compatible with all items, enter 'All'.
If it should be compatible with no item (so only if no item is in main hand), enter 'None'.
If it should be compatible with specific items, enter the IDs separated with comma.
If it should be compatible with all items except specific items, start with an '!' followed by the item IDs separated with comma (Note: The '!' should NOT be in front of each item ID but only the first char of this String)
The Off hand slot system is a module that you can turn off in DA_InventoryModules.
The off hand / 2nd hand slot is a special equip slot that is managed by the WB_EquipInventory. Hence the WB_EquipInventory has a reference to this equip slot.
The inventory has a torch item as example for an off hand item - if you equip a torch to this slot,
the torch shows up in the player’s left hand and the character also enters a holding pose in the animation blueprint.
Off Hand Compatibility
There might be some items (like certain weapons) that need both hands.
In this case the off hand should not be compatible anymore. During a not compatible item is selected in the hotbar, the off hand slot will be turned temporarily inactive.
To define this compatibility you can set it up in the item data table where the off hand item is.
Under EquipArmor you can find a field OffHandCompatibility_IfOffHand. If you hover that you should see a tooltip with an explanation how to use it.
However, here is this explanation too:
Only valid if EquipSlot is set to OffHand.
If it should be compatible with all items, enter 'All'.
If it should be compatible with no item (so only if no item is in main hand), enter 'None'.
If it should be compatible with specific items, enter the IDs separated with comma.
If it should be compatible with all items except specific items, start with an '!' followed by the item IDs separated with comma (Note: The '!' should NOT be in front of each item ID but only the first char of this String)
The Off hand slot system is a module that you can turn off in DA_InventoryModules.
Chests have different modules:
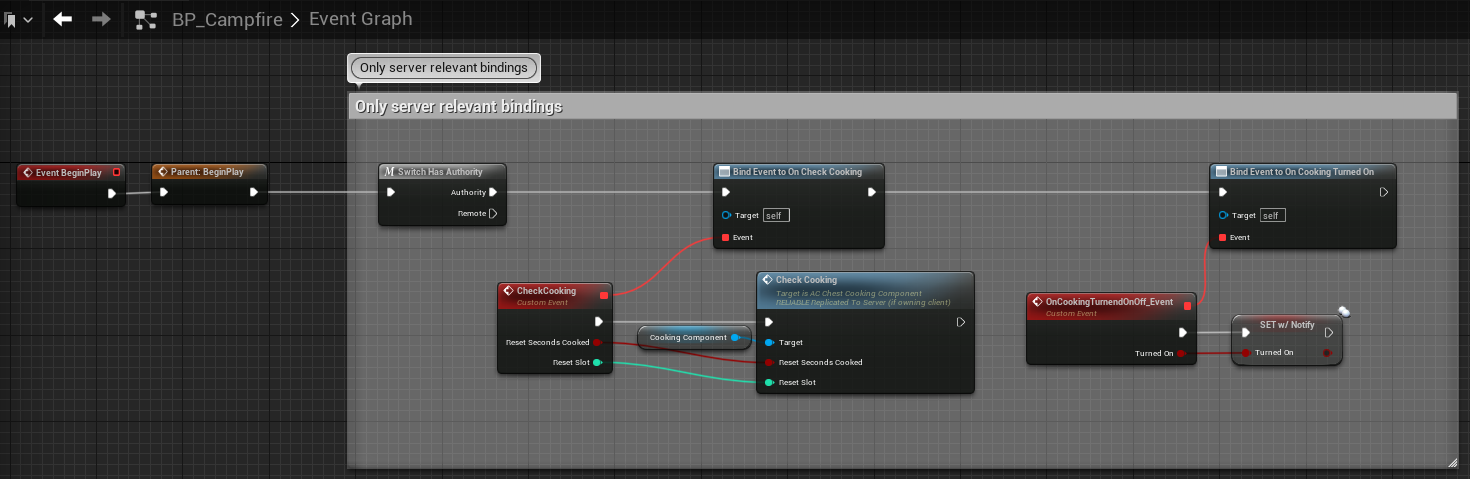 The last binding is optional, since it’s only used for a visual (decorative) indicator if the cooking station is turned on or off.
If you add a whole new cooking station class, you can copy these nodes from BP_Campfire. Or you can just duplicate the BP_Campfire actor class and then adjust it.
Loot Dead Player Module
Usually you are not creating new chests with this type. It is already used in BP_LootDeadBodyChest which should be enough.
General information for slot amount regarding all chest types
In every chest module (except StartingItemsModule) you can change the slots amount by adjusting the bar amount and slots per bar amount.
However, the total slots amount of a chest is clamped by another variable.
At the beginning a certain amount of chest slot widgets will be created.
Smaller chests might use only a few of these slots while bigger chests use more slots or all of them.
So the chest slot widgets get reused each time you open a chest and they are not every time new created.
To change the maximum slots a chest can have you can adjust the maxChestSlots variable in WB_ReplicatedSlotsManager.
For the best performance please make sure that you set maxChestSlots only that high as your biggest chest demands.
The last binding is optional, since it’s only used for a visual (decorative) indicator if the cooking station is turned on or off.
If you add a whole new cooking station class, you can copy these nodes from BP_Campfire. Or you can just duplicate the BP_Campfire actor class and then adjust it.
Loot Dead Player Module
Usually you are not creating new chests with this type. It is already used in BP_LootDeadBodyChest which should be enough.
General information for slot amount regarding all chest types
In every chest module (except StartingItemsModule) you can change the slots amount by adjusting the bar amount and slots per bar amount.
However, the total slots amount of a chest is clamped by another variable.
At the beginning a certain amount of chest slot widgets will be created.
Smaller chests might use only a few of these slots while bigger chests use more slots or all of them.
So the chest slot widgets get reused each time you open a chest and they are not every time new created.
To change the maximum slots a chest can have you can adjust the maxChestSlots variable in WB_ReplicatedSlotsManager.
For the best performance please make sure that you set maxChestSlots only that high as your biggest chest demands.
If you go to an item in an item data table you can set the Durability module to Enabled.
Current Durability and MaxDurability should be self-explanatory.
DurabilityReductionPerUse is a value that can be taken to reduce the durability of an item.
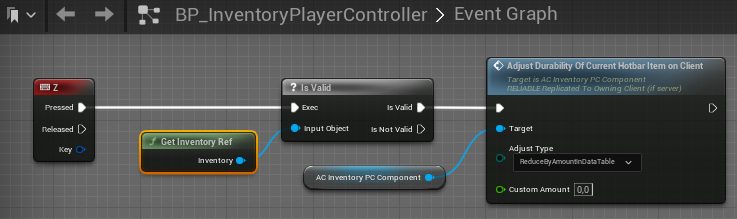
If you are taking a look at the current Durability reduction input (for testing purposes) you probably understand it better.
The AdjustDurabilityOfCurrentHotbarItemOnClient event has an AdjustType where you can make use of the value that is defined in the data table.
But you can also make use of the CustomAmount to reduce, increase or set the durability to a new fixed value.
 Another option in the data table is to constantly (over time) reduce the durability for an item. You can set some rules when it actually should reduce constantly durability.
An example is the torch that loses durability over time if it is equipped.
Another option in the data table is to constantly (over time) reduce the durability for an item. You can set some rules when it actually should reduce constantly durability.
An example is the torch that loses durability over time if it is equipped.
If the player dies, other players can loot the inventory of this player. To make the character mesh interactable, make sure that it blocks the visibility channel. The LootDeadBody system is a module that you can turn off in DA_InventoryModules.